Have you ever looked at your Blogger template and thought it looks a bit…Boring? But then you go to change your template and none of the available options seem to have the features you want. You scroll through Blogger’s list of extra features and widgets and still just can’t find what you need. You may find yourself wondering, “How do I make my blog stand out from the crowd and properly engaged the user?”
Blogs are designed to be “clean” and provide a distraction-free reading service, but sometimes the specific purpose or mission of your blog demands something a bit more dynamic and interactive. However, building an entire website of your own from scratch to accomplish what you want would be impractical, or maybe impossible for you due to the amount of HTML, Javascript, and other coding languages involved.
Luckily there is a kind of middle ground. Blogger allows you to create and add bits of HTML and Javascript to your Blogger blog, so that you can insert the kind of functions you want by creating custom widgets. These widgets, also known as gadgets on Blogger, are small tools or applications that can be added to a website or blog in order to create whatever function you need, in essence, or to bring in content and services from third-party websites. The diversity of these widgets (or gadgets) is almost as unlimited at your imagination. You can create countdown tickers, photos, games, or interactive applications that allow you to connect to your social media platforms and even chat right from your blog—making it a lot easier to keep up with your readers! Blogger widgets can also help you track your popularity, such as by listing your blog followers, and they can help you reach more people, for example by allowing readers to subscribe to your blog content. The following tutorial will step you through adding HTML and/or Javascript to your Blogger blog so that you can make it as dynamic and interesting as your written content:
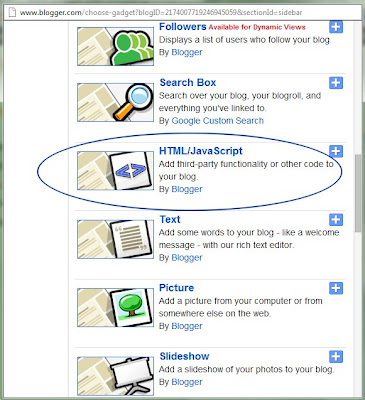
You'll be taken to the "Layout" page. Find an empty slots with "Add a Gadget" link on them. Choose where you want to put your code and click "Add a Gadget". This will open a small window with list of gadgets, find "HTML/JavaScript" gadget and click "+" to add it - see image below:
You're almost done. Now copy the code you want to add and paste it on "Content" box. You can also name the code in "Title" box (or leave it blank). Click "Save" and visit your blog. Your HTML/JavaScript code must be on place.
Blogs are designed to be “clean” and provide a distraction-free reading service, but sometimes the specific purpose or mission of your blog demands something a bit more dynamic and interactive. However, building an entire website of your own from scratch to accomplish what you want would be impractical, or maybe impossible for you due to the amount of HTML, Javascript, and other coding languages involved.
Luckily there is a kind of middle ground. Blogger allows you to create and add bits of HTML and Javascript to your Blogger blog, so that you can insert the kind of functions you want by creating custom widgets. These widgets, also known as gadgets on Blogger, are small tools or applications that can be added to a website or blog in order to create whatever function you need, in essence, or to bring in content and services from third-party websites. The diversity of these widgets (or gadgets) is almost as unlimited at your imagination. You can create countdown tickers, photos, games, or interactive applications that allow you to connect to your social media platforms and even chat right from your blog—making it a lot easier to keep up with your readers! Blogger widgets can also help you track your popularity, such as by listing your blog followers, and they can help you reach more people, for example by allowing readers to subscribe to your blog content. The following tutorial will step you through adding HTML and/or Javascript to your Blogger blog so that you can make it as dynamic and interesting as your written content:
Add HTML or JavaScript code to your Blogger blogs
Sign into your account. You will be taken to the Dashboard. Click on "Layout" of your blog - see image below:You'll be taken to the "Layout" page. Find an empty slots with "Add a Gadget" link on them. Choose where you want to put your code and click "Add a Gadget". This will open a small window with list of gadgets, find "HTML/JavaScript" gadget and click "+" to add it - see image below:
You're almost done. Now copy the code you want to add and paste it on "Content" box. You can also name the code in "Title" box (or leave it blank). Click "Save" and visit your blog. Your HTML/JavaScript code must be on place.


Comments
Post a Comment